Introduction
Like many of us fools alive after 1983, I found myself a few years ago at a bar, beer in hand, looking across the room at something I had never seen before. It was Taito’s 1983 game: Ice Cold Beer. A beautiful, 72 inch high cross between classic 1980’s arcade games, the golden era of pinball, and the Swedish puzzle game of Labyrinth.
Here's how the game works. Players sit in front of a vertical panel filled with a series of holes, each numbered and placed at different heights. At the bottom, a metal bar controlled by two joysticks, one on the left and another on the right, balances a single 5/8" metal ball. The goal? Navigate this ball up the panel and into a specific, lit hole, avoiding all the other non-lit ones which will take away a precious life and send the ball tumbling back to the start.
In the original game, players would play the same ten holes in the same order, 3 times. If you reached hole 10, the sequence would restart. This time, if you left the controls idle for a moment, it would inch up on you slowly, adding pressure to move faster. This automatic control increased in speed each time you reached the third round.
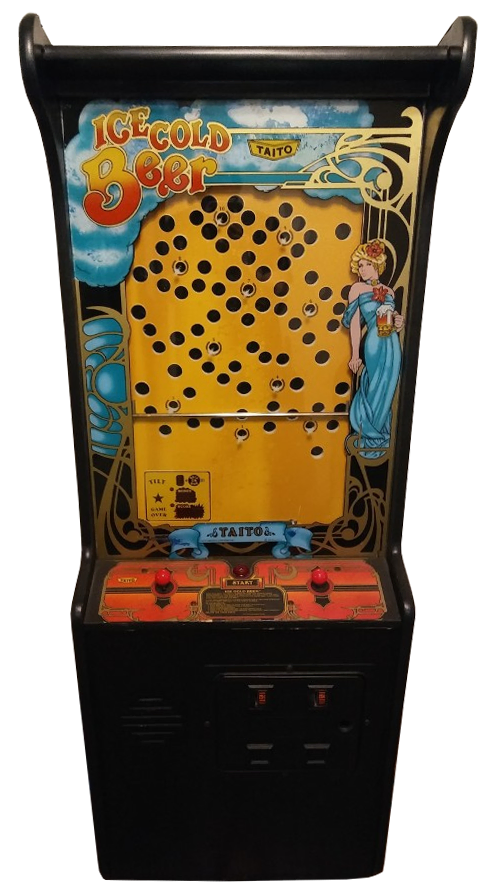 Ice Cold Beer. Taito, 1983
This game has entertained millions for over 50 years. I think its popularity is due to its simplicity, as well as the same thing that people love about pinball - it blends the digital and physical world to create a truly unique experience not found in other games.
In 2018, I looked into acquiring an original Ice Cold Beer machine, only to be met with significant challenges including transportation, availability, reliability, and cost. So, as all engineers would do, I started to figure out what it would take to build it myself. I spoke with a few friends who share a love for interesting games and side projects like this and talked about all the ways we could recreate and improve it. What if every hole had a sensor and light? What if it was connected to the internet, or had a digital display? How could we use sounds, lights, and music to make the experience even better?
What if we took Ice Cold Beer and made it even cooler? Well, we might arrive eventually at something closer to Zero Kelvin.
And so, in 2023, 50 years after the original game bent the rules of traditional arcades, we started to build our remake: Zero Kelvin. I’m working with Rob McDiarmid, a brilliant engineer and woodworker, to bring this idea to life.
This is what we've done so far.
Concept
Zero Kelvin is a deep space action/arcade game featuring a variety of game modes played on physical hardware similar to Taito’s Ice Cold beer.
Background
Amidst the vast, uncharted expanse of the cosmos, you are a lone astronaut on a daring quest to discover the edge of the universe. Your journey leads you deep into ancient alien oceans and beneath ice-clad planets, down glistening crystal chasms, and through endless fields of frozen debris. With the fabric of space as your frontier, your mission is clear: to delve into the unknown, where every leap could be your last. Play alone or with friends, and venture farther than mankind has ever been. Whatever you do, don’t lose your cool.
Hardware
We are hoping to honor the original game with the design of Zero Kelvin. The cabinet will be based off the original design, and we will provide a Classic game mode and board layout that closely resemble the original Taito game.
Some of the improvements we are hoping to make with hardware include:
- Every hole will support a switch and LEDs
- The board will be replaceable, allowing for variations in target layout as well as layouts for specific game modes
- The cabinet will be separate from the game and the two can be separated for easy troubleshooting
- Custom 4 - 6” display
- Onboard speakers, lights, and beer fridge?
Not convinced? Here’s some shots of the beautiful cabinet that Rob has been working on with the removable play area.
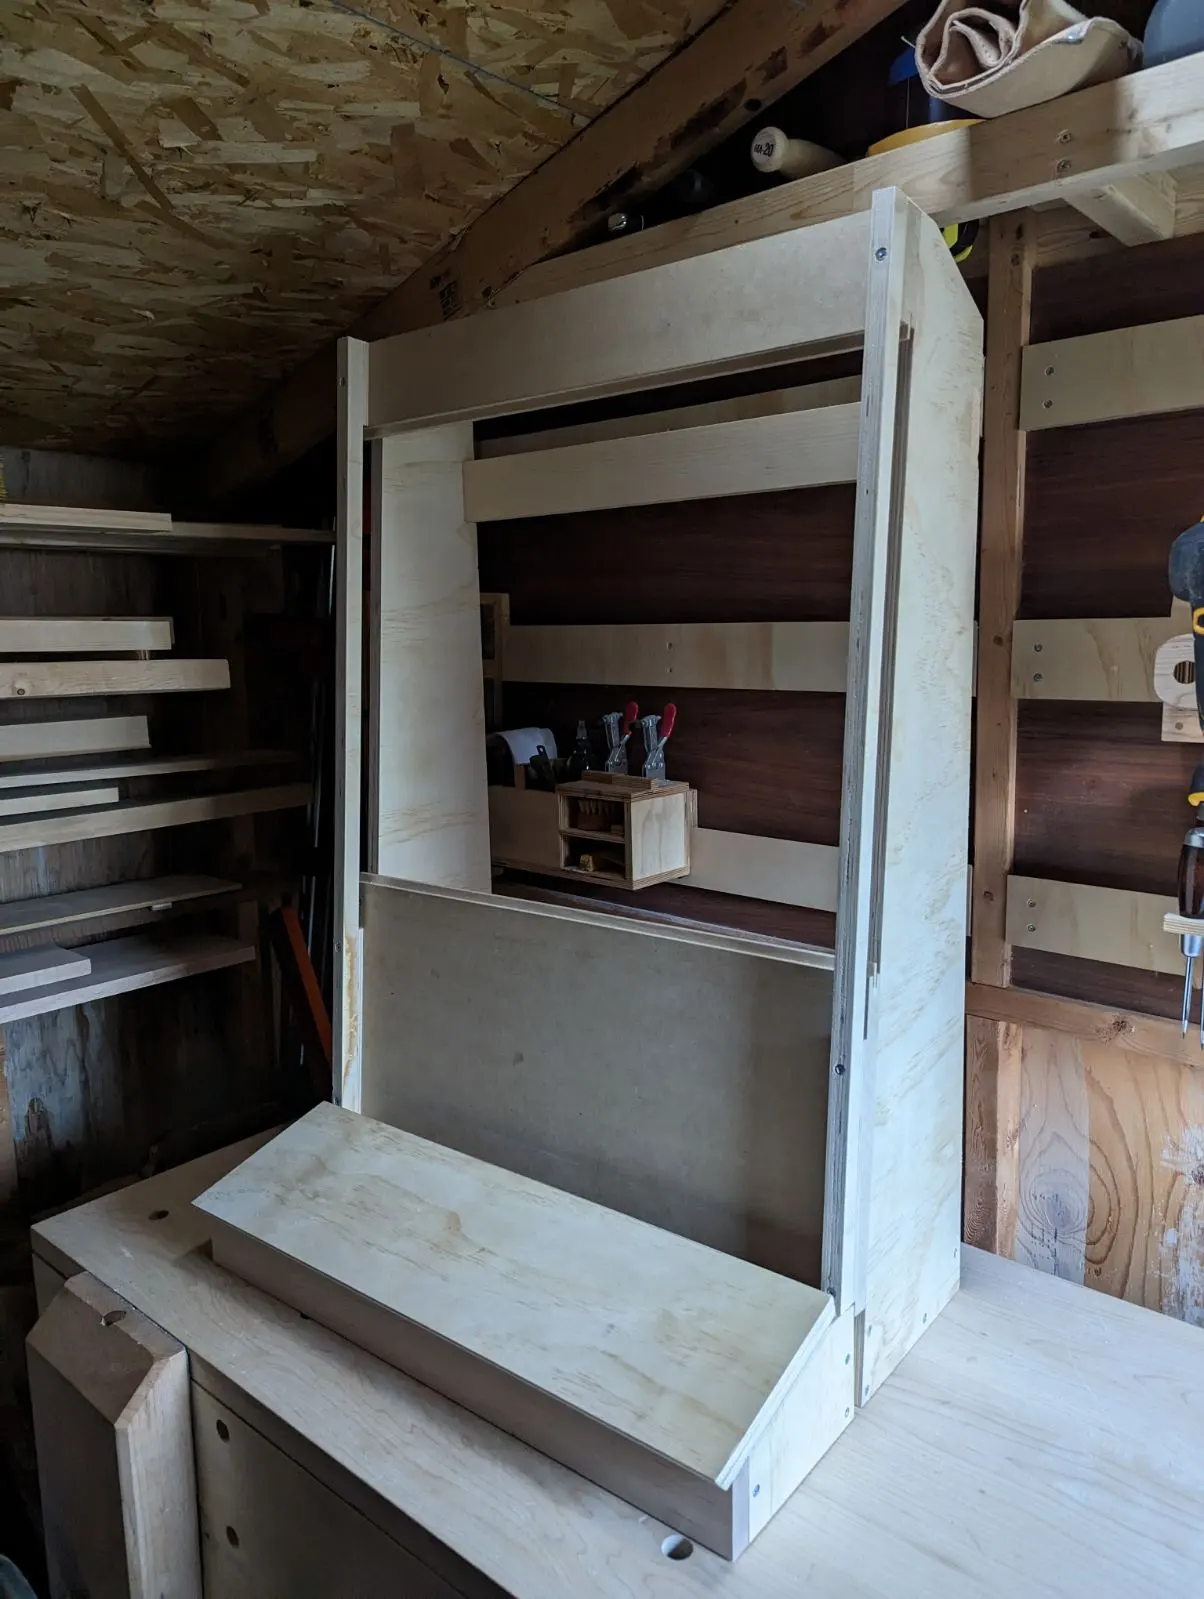
Design
The overall design of the system is quite simple. Two pulleys controlled by motors will move the bar up and down over the board. A small LCD display will display game status, points, menus, etc. The holes will be machined into a removable plate, which will power the lights and IR LED switches. A custom arcade control panel will use the original Ice Cold Beer joysticks and will support a few more buttons than the original game.
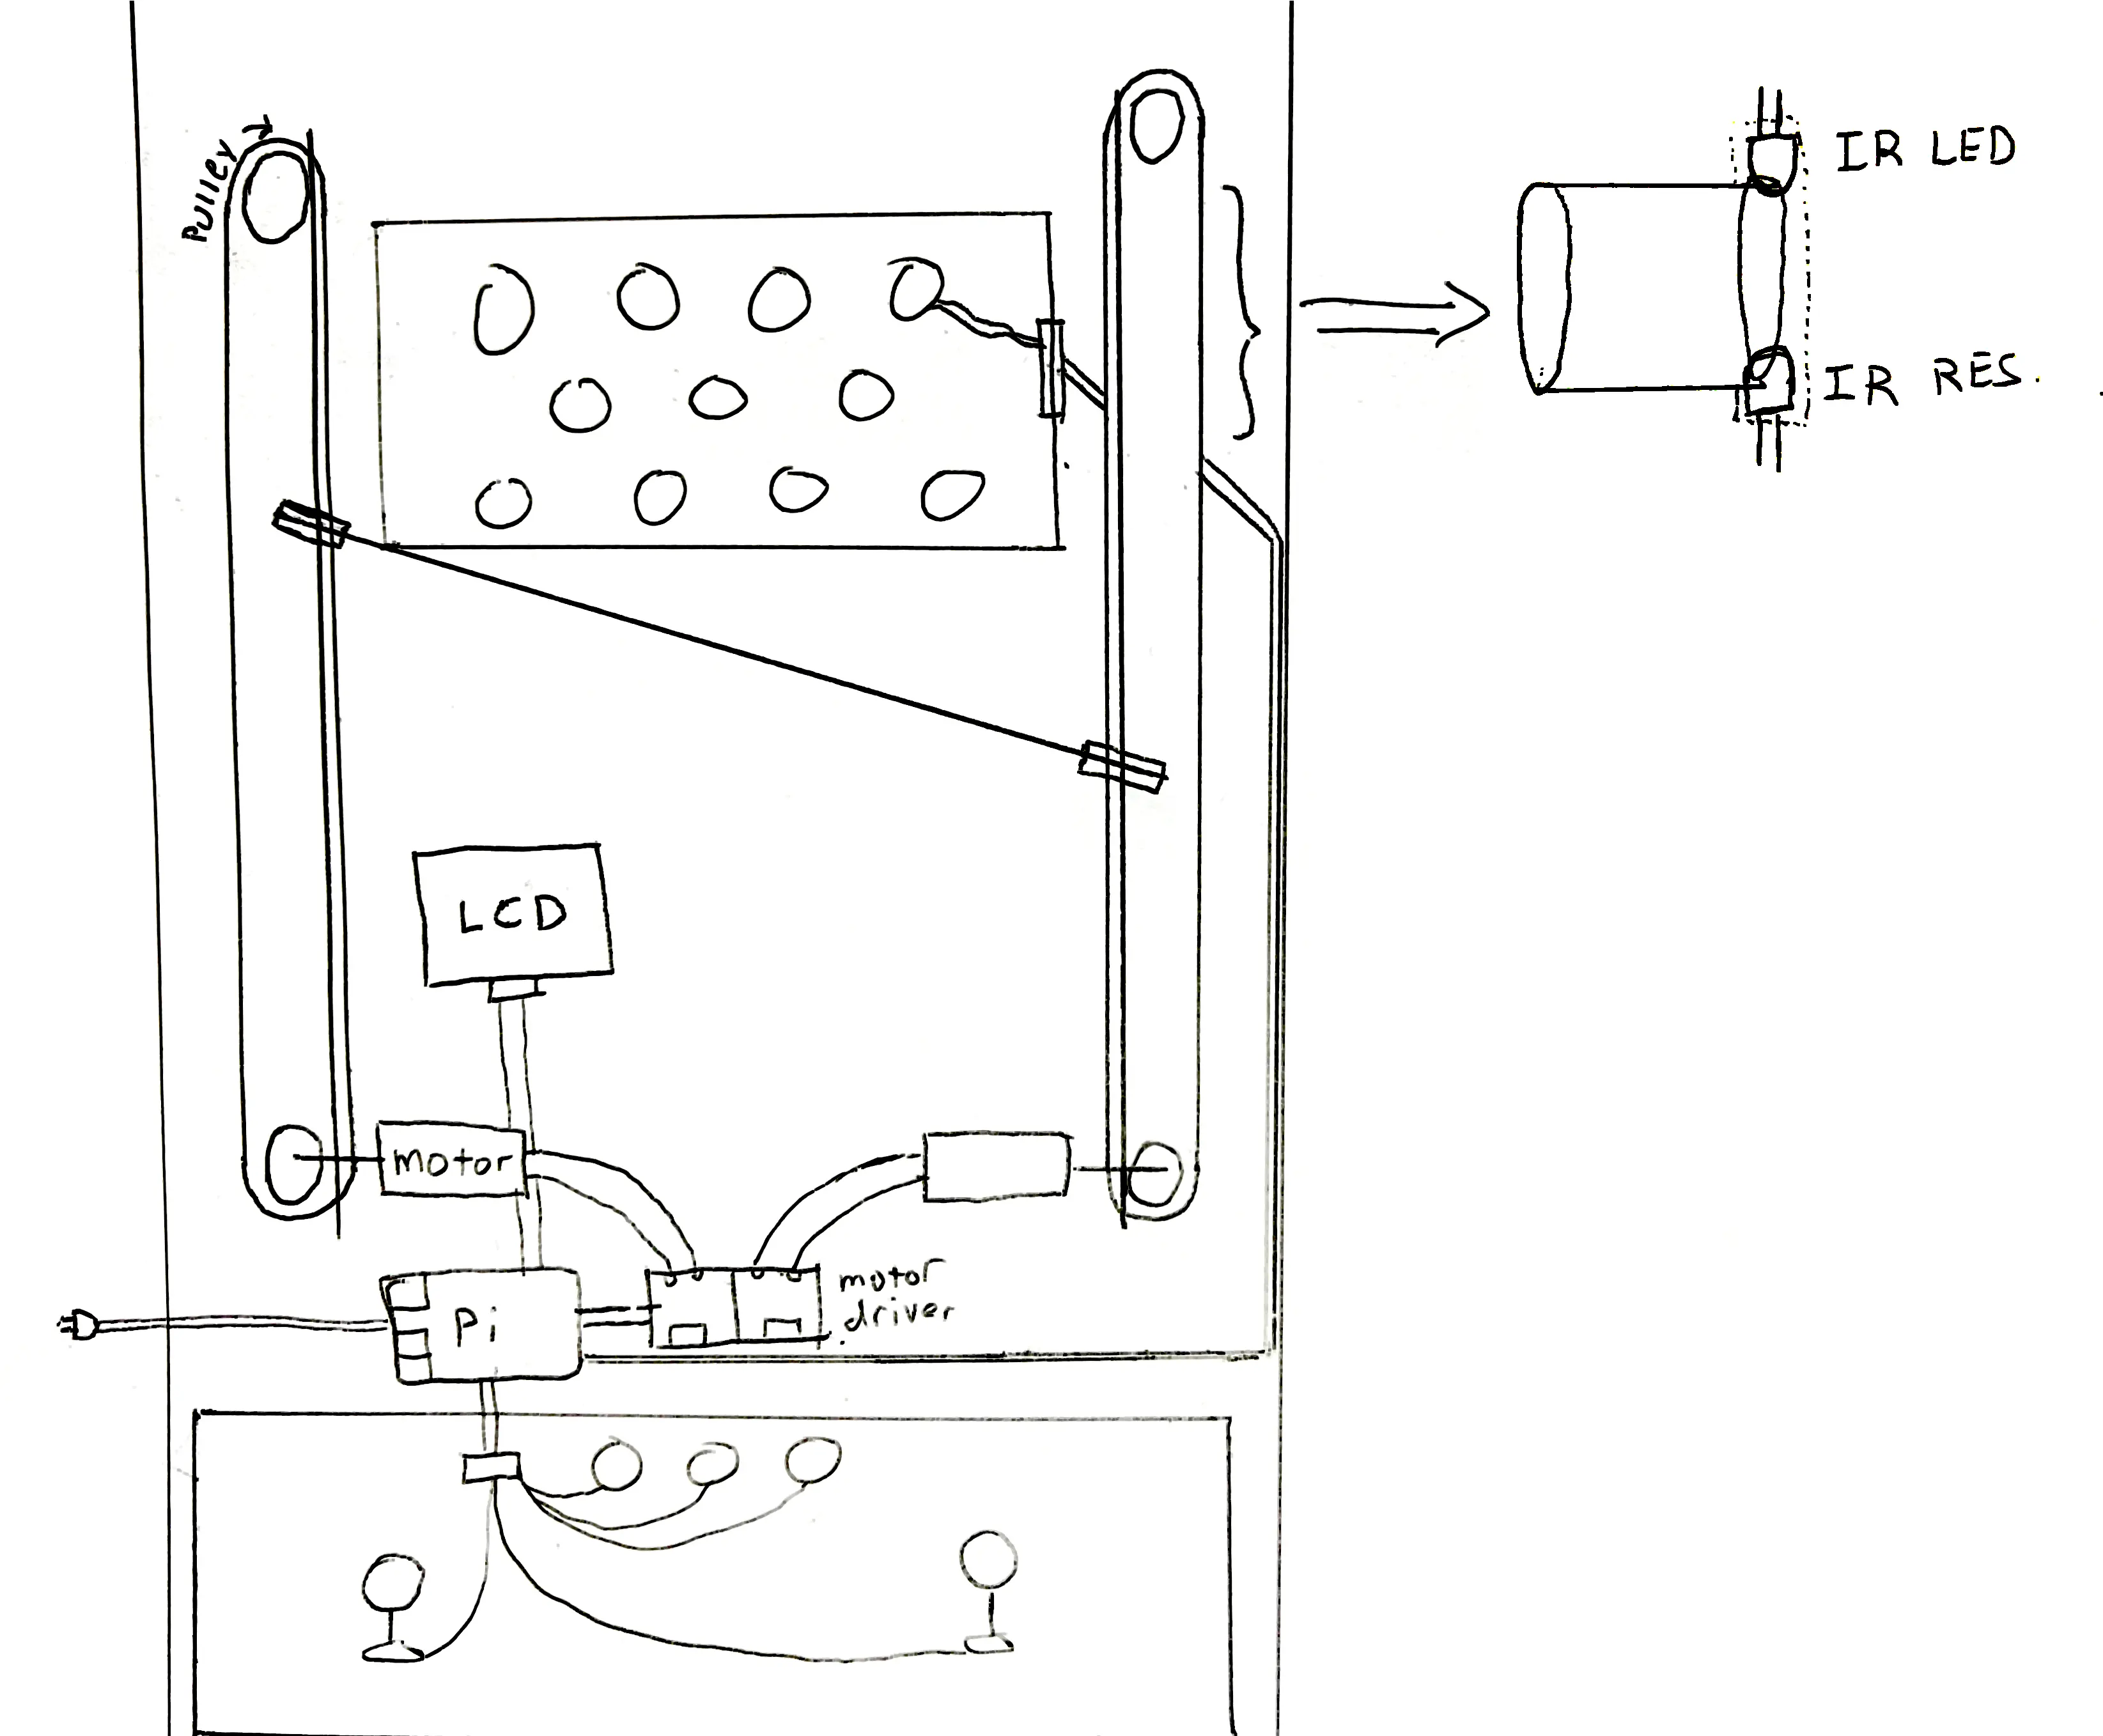
Drive System
The first problem we wanted to solve was getting the game moving with motors and pulleys. This needs to feel good to play, be quiet enough to not distract from the game, and needs enough torque to respond quickly without shaking the machine.
We decided to go with and two 12V 400rpm motors from Amazon. We roughly calculated that 400RPM was in the right range for speed with our pulleys, and it was rated for 3.4Kg.cm which seemed sufficient to drive the small bar. We picked up two L298N motor drivers, chosen for their low cost, high availability, and ease of use. It was easy to control these motors using a simple Python script.
Click here to see the Python script used to control these motors
# motor.py
import atexit
import RPi.GPIO as GPIO

GPIO.setmode(GPIO.BCM)

class Motor:
    IN1_PIN = None
    IN2_PIN = None

    IN1 = None
    IN2 = None

    def __init__(self, pin1, pin2, frequency_hz = 100):
        self.IN1_PIN = pin1
        self.IN2_PIN = pin2
        self.freq = frequency_hz

    def __enter__(self):
        GPIO.setup(self.IN1_PIN, GPIO.OUT)
        GPIO.setup(self.IN2_PIN, GPIO.OUT)

        self.IN1 = GPIO.PWM(self.IN1_PIN, self.freq)
        self.IN2 = GPIO.PWM(self.IN2_PIN, self.freq)

        return self

    def __exit__(self, *args):
        self.IN1.stop()
        self.IN2.stop()

    def up(self, speed):
        print(f"UP SPEED: {speed}")
        self.IN1.sp
        self.IN1.start(speed)
        self.IN2.start(0)

    def down(self, speed):
        print(f"DOWN SPEED: {speed}")
        self.IN1.start(0)
        self.IN2.start(speed)

    def stop(self):
        self.IN1.stop()
        self.IN2.stop()

atexit.register(GPIO.cleanup)
The pulleys and brackets were 3D printed, and mounted along a 36” aluminum angle. This made them easier to build and provided a lot of support. I cut and heat welded a polyurethane pulley across the pulleys.
Sensors
The second problem we wanted to solve was the sensors. The original game only had 10 holes that could be individually sensed. If the ball goes in any of the other holes, they all drop the ball into a single channel with a single, “failure” switch. But if we wanted new game modes, lights and varying targets are one of the best methods we have.
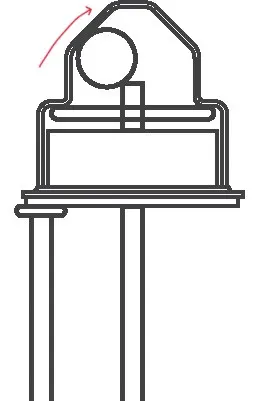
Our goal is a sensor that is fast, low cost, accurate, and takes up minimal space. This is because we need to pack a lot of sensors close together. For example, consider the layout of hole 10 where hazards fill the space around the final target. If each of these hazards requires its own sensor and light, you can imagine it would get quite busy.
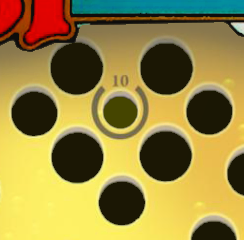 Ice Cold Beer Hole 10
We primarily evaluated two options:
- Magnasphere magnetic switches (specifically the MG-B2-20-S)
- Infra-red LEDs and phototransistors (ie. I.R. Sensors)
Magnasphere
This is a really cool little switch, you can get them for about $10 a piece and it's pretty brilliant how they work. Inside, there's a small magnetic sphere (the magnasphere I'm sure) surrounded by a nonmagnetic housing. A small magnetic force naturally repels the ball from the top of the sensor, even when the switch is facing downward. When a strong enough magnetic material passes the top of the switch, it pulls the sphere the bottom of the case, making contact with the electrode and closing the switch.
 Magnasphere technology
Infra-Red LED + Sensor
This is a much cheaper solution at $1-2 per switch (cheaper for volume pricing). This method uses an Infra-Red (I.R.) LED and I.R. phototransistor, also known as an I.R. Light Sensor. We 3D print a small housing that fits into the holes in the board. On one side of the housing we mount an I.R. LED, and on the other we mount a sensor. If the sensor sees the light, the ball is absent. If the sensor cannot see the light, there must be something in the way.
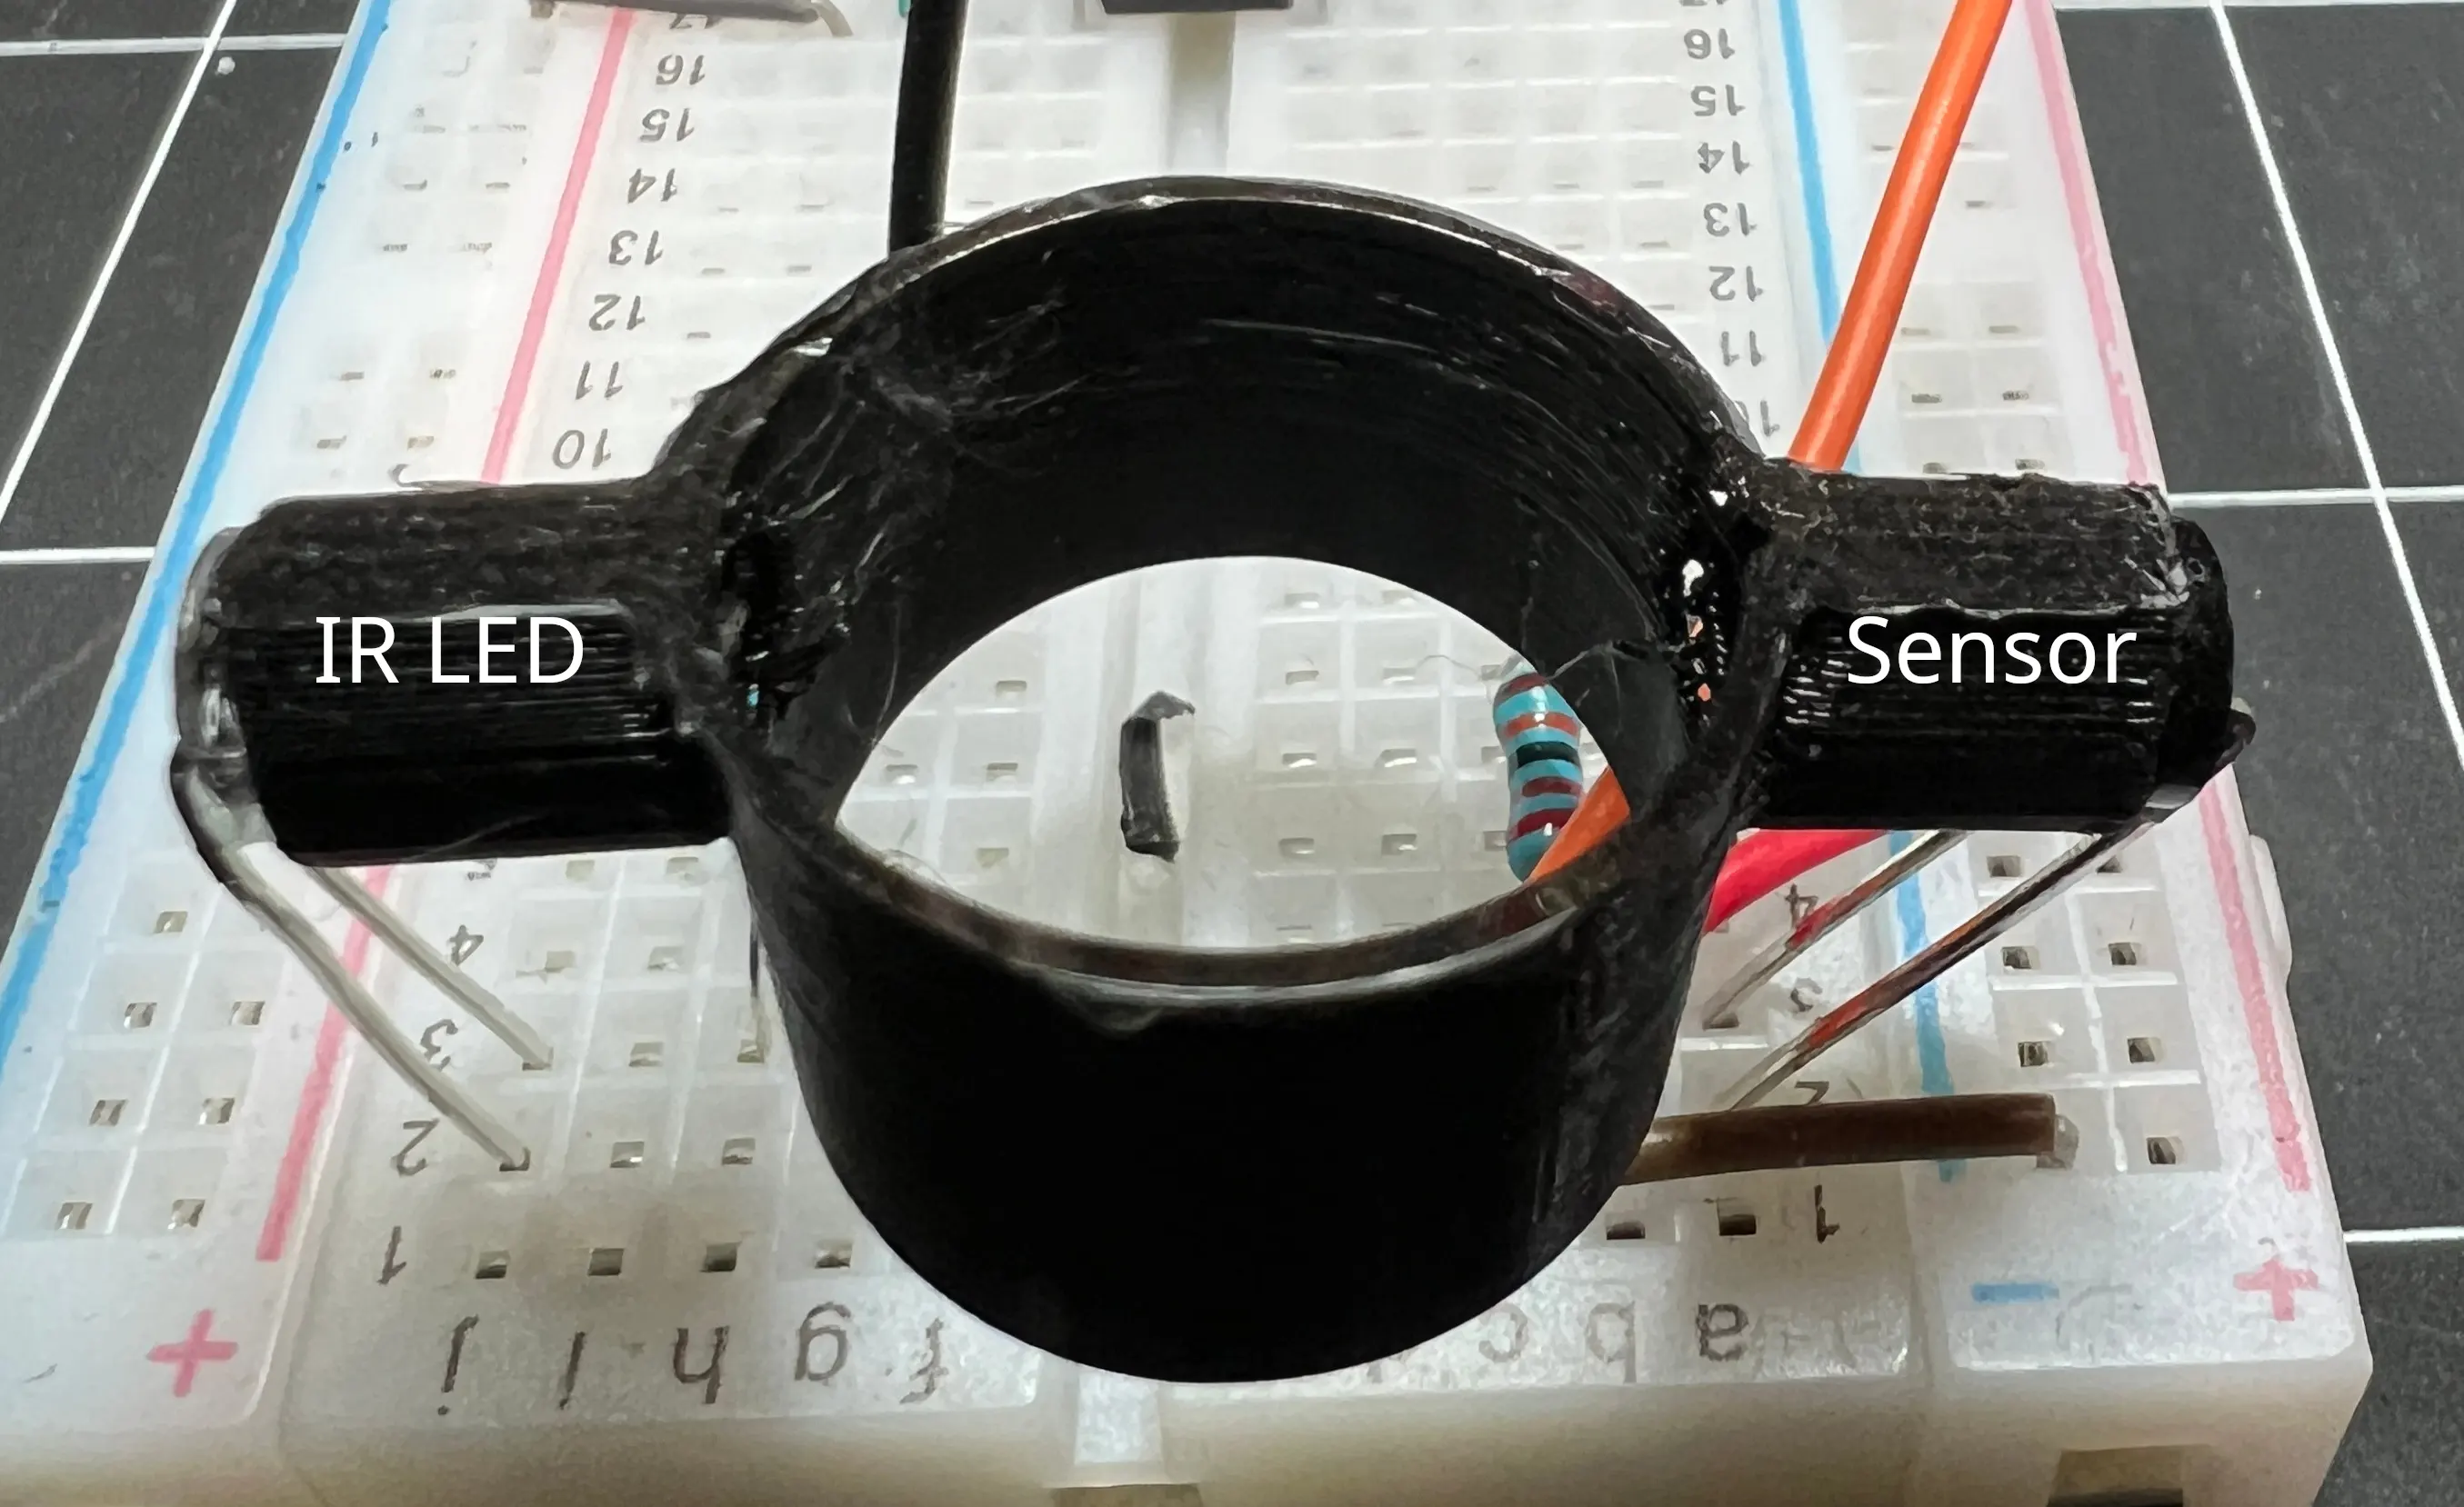 I.R. LED Sensor
Given the potentially high cost of the Magnasphere approach (~60 - 80 holes at $10 a unit), we prototyped the I.R. approach first. It worked so well and was so easy to set up that we didn’t see a need to develop a proof of concept for the Magnasphere approach.
The one risk we are considering is light pollution creating noise - I.R. light can be difficult to control, and any noise could result in invalid switch firing affecting the game. However, we are confident that using traditional off the shelf methods of restricting light, as well as 3D printing an opaque housing, we can control the light enough for the level of accuracy required for this project.
Software
Display
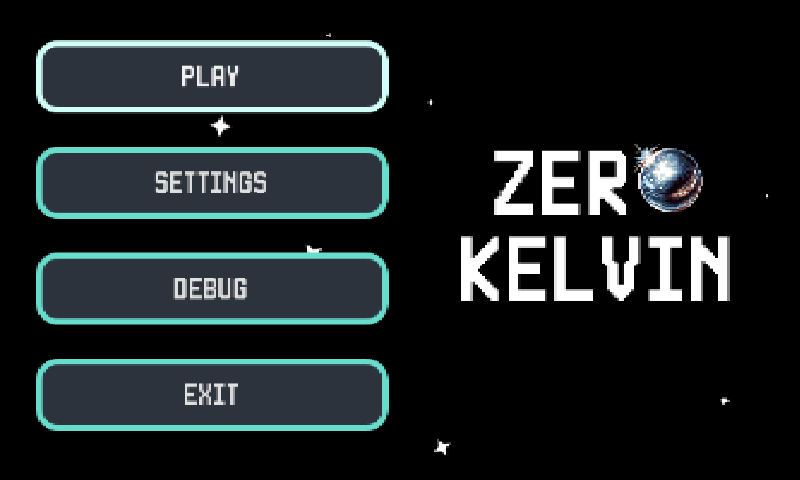
The display will be implemented in Godot. This is mostly as a learning exercise as I've always wanted to learn a game engine and this is a low risk way to play around with it. The game will feature a 4 - 6" LCD screen that will show the player their game status, as well as all the in game menus, mode select, and more.
Some of the game modes could feature video modes. We talked about some crazy ideas: a roguelike mode, or a deep sea diving mode where you race against time and limited oxygen to the beat of Karl Casey’s White Bat album. These are just some of the things we can explore with a full display and full switched/lit targets on the game board.
Hardware / Software Interface
This is one of the more interesting challenges I’ve faced. How can we make it easy to develop software in the absence of specialized hardware, but also ensure that the hardware is easy to control and feels good in players’ hands? I considered a few options:
- System calls from Godot to some shell script on the Linux host (ex.
sh set_motor.sh --direction left --speed 50) - A webserver sitting on the pi listening for commands from a remote client
- Quickly reading and writing to/from a file or pointer in shared memory
- Using C# support for Godot to control the Raspberry PI GPIO directly
After a lot of research and a few attempts, I settled on a lightweight UDP server with a very primitive ordering mechanism. Here’s how it works:
- The Raspberry Pi runs a small Python host on a known port
- The Godot client sends UDP messages 60 times a second with the current values for the right and left stick (-1, 0, or 1)
- Each message also contains a sequence number (an integer starting at 1)
- As UDP messages flood into the Python server, it reads messages and sets GPIO state to match, then records the sequence number it has processed. If it gets any packets out of sequence, it will drop those that come before its current sequence
This works surprisingly well and was very easy to implement now that I had the motor control working well. It also allows me to maintain a server state that I can use to properly handle GPIO initialization and teardown, deal with connectivity issues and retries, and store state. It could also be used in the future to transmit the sensor state as a response.
from contextlib import ExitStack
import json
import socket
import logging as log

from motor import Motor # motor.py above

def process(message, last_message):
    if last_message and message['seq'] < last_message['seq']:
        log.warning(f"Received out of sync packets: {message['seq']}, {last_message['seq']}")
        return last_message
    return message

def start_server(host='127.0.0.1', port=12345):
    with ExitStack() as stack:
        MOTORS = {
            'LEFT': stack.enter_context(Motor(23, 24)),
            'RIGHT': stack.enter_context(Motor(25, 8)),
        }
        udp_socket = stack.enter_context(socket.socket(socket.AF_INET, socket.SOCK_DGRAM))
        udp_socket.bind((host, port))

        last_message = None
        while True:
            data, addr = udp_socket.recvfrom(1024)
            try:
                state = json.loads(data)
                last_message = process(state, last_message)
                for direction, motor in MOTORS.items():
                    speed = state[direction.lower()]
                    if speed > 0:
                        motor.up(speed)
                    elif speed < 0:
                        motor.down(-speed)
                    else:
                        motor.stop()
            except json.JSONDecodeError as e:
                log.error(f"Error decoding JSON from {addr}: {e}")

if __name__ == "__main__":
    start_server()
Result
Here’s a final demo of the parts that are working so far. This is controlled in real time by accepting input through Godot’s native input system and broadcasting motor speeds over the UDP stream.
Next Steps
The next phase is about putting these individual components together to simulate the real game so we can confirm that everything feels right. To avoid spending a lot of time wiring up sensors and lights before we had everything working, I will create a custom display on the touch-sensitive LCD to manually choose which holes are sunk. That way, we can “play” the game to test the other components without needing to complete this step.
Tune in next time to hopefully see a few things moving in an upright cabinet!
Curious what else I'm building? Contact Me